¶ How to install unlocker?
- Download UnlockerCore:
Download Here - Install UnlockerCore:
Once the download is complete, locate the downloaded UnlockerCore.exe file.
Run the executable file.
If the unlocker is closing after changing the location, please see Cannot Run UnlockerCore.
- Unlocker Settings:
Make your settings at unlocker section of dashboard. - Launch UnlockerCore:
Go to unlocker section on dashboard.
Click on "Start Unlocker".
¶ Base Folder
Base folder of the unlocker.
%localappdata%/Eclipsed/Unlocker
or
C:\Users\{Username}\AppData\Local\Eclipsed\Unlocker
¶ Clearing Cache
-
Go to the base folder of unlocker
-
Remove the
Cachefolder.
¶ Manual Certificate Installation
If the unlocker is stuck on "Waiting for you to trust certificate", you can try installating the certificate manually.
-
Go to the base folder of unlocker
-
Go to the
Certsfolder -
Right click to
EclipsedCertificate.p12and click on Install PFX -
Select
Current UserorLocal Machine -
Skip the select file
-
Type the password of certificate
debecb6dfd034ae3aafc6774049eca52
- Select
Place all certificates in the following store
- Click Browse
- Select Trusted Root Certification Authories
- Restart the unlocker
¶ Local Launch
Local launch enables you to relaunch without the need to start again from the dashboard.
UnlockerCore sessions are valid for 7 days, after this period, you will need to initiate the session from the dashboard once again.
UnlockerCore will save your sessions to a file.
How to logout without waiting 7 days
- Go to the base folder of unlocker
- Go to
envfolder. - Remove the folder named
ll. - Restart UnlockerCore
¶ Common Errors
¶ Cannot Connect To Internet After Using Unlocker
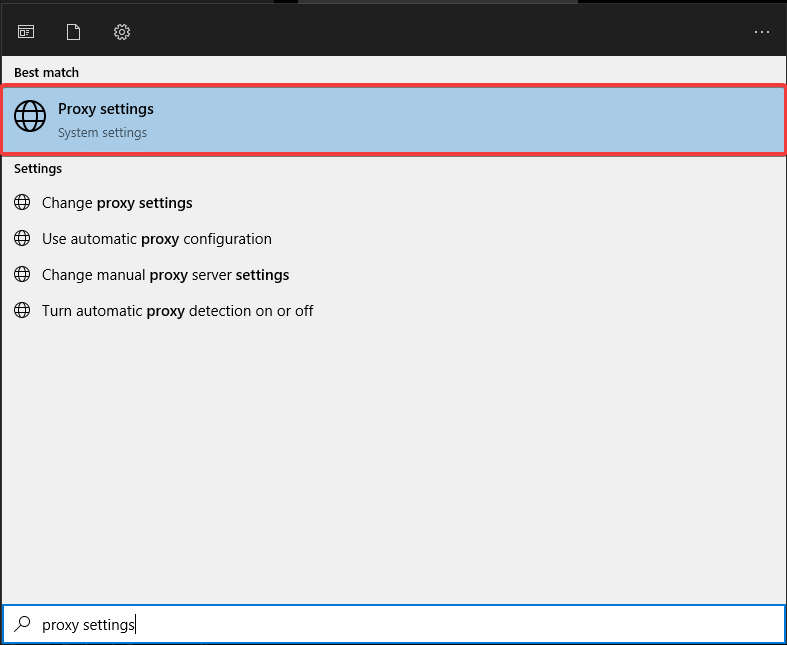
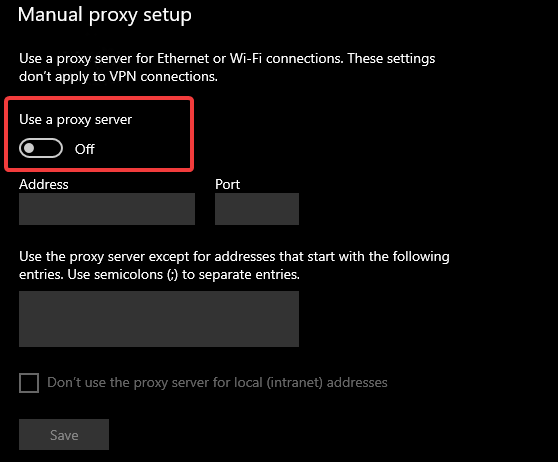
If the unlocker didn't closed properly it can lead software to not be able to turn off proxy, heres how you can do it yourself.
- Type "proxy settings" to search.

- Turn off "Use a proxy server"

¶ Cannot Run UnlockerCore
If you are experiencing issues with running UnlockerCore, follow the steps below to troubleshoot the problem.
- Disable Antivirus
Sometimes, antivirus programs may interfere with the proper execution of UnlockerCore. Follow these steps to disable your antivirus temporarily:- Windows Defender
1. Open Windows Security- Click on "Virus & threat protection"
- Scroll down to "Virus & threat protection settings" and turn off "Real-time protection"
- Third-Party Antivirus
Access your antivirus software and find the option to disable real-time protection or temporarily disable the entire antivirus.
- Windows Defender
After disabling the antivirus, try running UnlockerCore again to check if the issue persists.
- Additional
- Ensure that you are using the latest version of UnlockerCore, as newer versions may have addressed compatibility issues.
- Check for any system updates and install them, as outdated software may cause conflicts.
If the issue still persists, create a ticket in our discord server.
¶ Virtualization
If the unlocker is closing after changing the location try changing Virtualization to ON in bios.
- Access BIOS/UEFI
- Restart your computer and enter the BIOS/UEFI settings. This is typically done by pressing a key (such as F2, Del, Esc, or F10) during the initial boot process.
- Locate Virtualization Settings
- Look for a section related to CPU or Advanced settings. There should be an option for "Virtualization," "Intel VT-x," or "AMD-V." Enable this option.
- Save Changes and Exit
- Save the changes made to the BIOS/UEFI settings and exit. This usually involves pressing a key (such as F10) and confirming the changes.
After enabling virtualization, restart your computer and attempt to run UnlockerCore again.